Welcome to the hydroponic cannabis growing section. There are many ways to grow cannabis in hydroponic setups. Use this section to discuss your ideas, methods and ask any questions you may have about growing cannabis in hydroponic systems. To become part of our online cannabis growing community click here to register.

NFT MADE EASY

Discuss growing cannabis hydroponically
Post Reply
User avatar
Nanook
Registered User
Posts: 9793
Joined: Thu Jan 01, 1970 2:33 am
Location: My nest
Has thanked: 507 times
Been thanked: 758 times
Contact:
Status: Offline

NFT MADE EASY

Post by Nanook »

NFT MADE EASY - A beginners guide to monster crops while being lazy
By the Black Grouse 2018
THIS IS A WORK IN PROGRESS - Just a little project I put together to try and help others. Feel free to add to it etc in the comments - or question things.

Introduction:-

I have been growing marijuana for many years now and I have used various techniques like soil, soil-less mix, deep water culture, recirculating deep water culture and NFT. I have also used a variety of lights, fans, filters, environmental controllers and believe I have perfected one of the easiest ways to pull 4 ounce minimum per plant with very little work involved.
I am writing this in hope it can help some others master this amazing plant for medicinal or recreational use.

If anyone has any disagreements please feel free to contact me, no flaming please though as this is purely what I have found to work. There are hundreds of other books and videos available so please don't stop at this one unless you are as lazy as me :)

I must also add, I am not a writer.
I should also add I have not been given money or goods to name certain brands, its just what I use... although I am happy to accept anything free ;)

Disclaimer – some of the images here are stolen from various places online... if anyone's upset sorry, this was not my intention.

If anyone gets caught doing this illegally... again, this is NOT my problem, we all have free will!


SHOPPING LIST -

Seeds x10 ( We use 8 but expect a few not to do well, if they all sprout just pick the best looking ones and bin the other two )
GT901 NTF kits x2.
Hailea water chillers x2.
Pumps for Hailea chillers x2.
Hose pipe.
Hose pipe female ends x4, and a male to male joiner.
Hailea nutrient heaters x2.
3” large hole rockwool squares x8.
Growth technology Root Riot plugs – 1 tray.
Rhino Pro 250x1000 carbon filter.
Systemair RKV 250.
250mm ducting.
SMSCOM fan controller with probe.
Tri-Meter x2.
O'D Air ozone generator.
Widow 4 lighting contactor.
Ionic Grow x5 litres.
Ionic Bloom x5 litres.
Growth technology Liquid Oxygen x5 litres.
Growth technology PH down x1 litre.
Growth technology Liquid silicon ( PH up ) x1 litre.
Growth technology PK Boost x5 litre.
Omega lighting 400v 1000w double end lights with reflectors and digital dimmable ballasts x2.
Jack chain – however much you need to hang lights.
Not essential but saves electric – florescent tubes for starting out or some low wattage MH/HPS. I tend to just use 600w ( lowest setting ) but it is a bit of a waste for the first few weeks.
Heater – set to 20 degrees Centigrade.
Fan – fairly powerful one, preferably oscillating.
High/Low temp and humidity reader.

Quite a list isn't it, but there's no point doing things half arsed!

Part 1:- Picking your variety

There are 3 types of cannabis. These are...
Indica – couch lock
Sativa – head high
Ruderalis - autoflower

I will be using an indica/sativa hybrid in this book – Blue Cheese by Barneys Farm. I have grown this on and off for approximately 6 years and it is one of my all time favourites. It is a hardy plant and takes temperature fluctuations well and seems quite mould resilient. It has a THC level of 23% and 0.8% CBD and is a lovely bedtime smoke. Personally I don't go by any of the breeders yields per square meter as to me its a case of... how long is a piece of string.

I suggest you try a few if you can from other people before deciding what you want to grow.

TIP:- In NFT ALWAYS get feminised seeds! You cant pull a plant if it turns out to be male by the time it shows its sex!

So, you've ordered your seeds and they have arrived – what next?
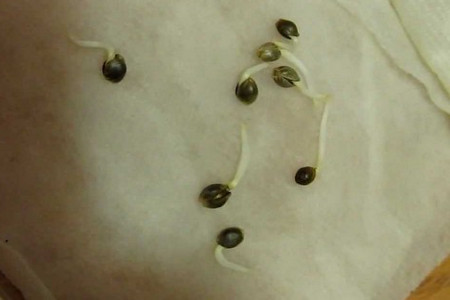
I use the wet paper towel method to germinate them. Get a paper towel, fold it and place the seeds in it on a plate.

Add some water ( don't drown them, but also don't let them dry out ) and check on them every 24 hours for more water or roots. I find around 20 degrees Centigrade to be about ideal for germination.
The quieter you become, the more you are able to hear.

Nanook
Registered User
Posts: 9793
Joined: Thu Jan 01, 1970 2:33 am
Location: My nest
Has thanked: 507 times
Been thanked: 758 times
Contact:
Status: Offline

Re: NFT MADE EASY

Post by Nanook »

Part 2:- Transferring your seeds to cubes.

Now that your seeds have tails, I transfer them to Growth technology root riot cubes. These are a spongy medium that soaks in water but also allows the root air to breath.


Eventually they will look like this...

This is the time to transfer them to Rockwool cubes – I use 3” cubes with large holes and put a cube cap on top.

Next we need to look at out NFT setup. For this I will be using...
2 GT901's
2 Hailea water chillers
2 pumps for the chillers ( set to 18 )
2 pumps for nutrient feeding
2 aquarium wave makers – for mixing nutrients
2 Hailea nutrient heaters ( set to 17 )
WHITE correx sheets
2 Nutridip TRI-Meters

I will run through the setup for one, there's no point duplicating for both.

I install the heater in the middle, set to 17 degrees centigrade on 24/7 ( thermostatically controlled )
I install the pump for the hailea chiller to a hose, then back from the hailea output to the NFT tank. I also install a hosepipe female connector on the end to allow for emptying the NFT tank.
The Other pump goes straight to the tray to deliver nutrients.
The wave maker I put on the right hand side and only use when adjusting PH/EC to ensure its well mixed.
The TRI-Meter probes sit in the nutrient solution and give ppm, ph and temp readings. BE CAREFUL – IF THE LIGHTS ARE ON AND THIS IS ON THE SAME CIRCUIT, THE READINGS WILL BE WRONG!!!!!!! THIS GOES FOR ALL METERS I HAVE TRIED!
ALSO TRY AND GET 2 METERS FOR BOTH PH AND EC... AS A BACKUP!

First step – use the spreader mat and cover the tray. I like to leave excess so it dips into the nutrient solution and stops the running water noise – much more stealthy ;)
Also I like to add a couple bits of cardboard at the top end to allow the nutrient to flow a bit faster, especially during the start to save drowning the plants before they can drink adequately.

Second step – Mark where you are going to cut holes in your Black correx sheets. I only do 4 plants per tray, repeat for the white correx. Place the black correx on top of the tray and add your plants in the holes. Now place the white correx on top carefully making sure not to damage plants and use a few bits of tape either end to hold it in place.

Third step – Fill the tank to the minimum level with tap water. My EC from the tap is 0.4.
Add 50ml of Growth Technologies Liquid Oxygen.
Add Growth Technologies Ionic Hydro Grow till EC reaches 0.5 ( the plants don't need much for a while yet and less is more )

TIP – Whenever making adjustments to PH or EC turn off the nutrient pump. ALWAYS check once you are happy with adjustments the pump has water flow and isn't clogged once plugged back in.

So! Now your all ready to setup your environment!

User avatar
Nanook
Registered User
Posts: 9793
Joined: Thu Jan 01, 1970 2:33 am
Location: My nest
Has thanked: 507 times
Been thanked: 758 times
Contact:
Status: Offline

Re: NFT MADE EASY

Post by Nanook »

Part 3:- Environment


I suggest you actually do this part while your seeds are germinating. There's no point germinating seeds and finding out your too busy to setup and loosing them!

Hang the lights from the ceiling with jack chain or your grow tent, or as I do, a photographers backdrop frame. I only do this to save holes in the ceiling.

Hang the fan if possible to avoid noise, connect it to the fan controller and set it to minimum lowest, temp 25 degrees Centigrade. Put the probe where the plant canopy is and use the ducting and tape/jubilee clips to attach it to the carbon filter.
I use a passive intake – but some people may need an intake fan. I will not be going over this but its pretty self explanatory.
I personally put my fan on my light timer because when its cold my heater struggles to cope, this keeps them cool when the lights are on and strengthens the stems, while not chilling them during their sleep.

You want your lights on temperature to be about 25C and lights off 20C – a swing of about 5C is perfect.

Water temp is perfect at about 18C

Humidity I wont go over. Mine is always wrong in veg and to be honest its only flower I really worry because of bud rot.

User avatar
Nanook
Registered User
Posts: 9793
Joined: Thu Jan 01, 1970 2:33 am
Location: My nest
Has thanked: 507 times
Been thanked: 758 times
Contact:
Status: Offline

Re: NFT MADE EASY

Post by Nanook »

Part 4:- Veg in the NFT


I will call this week 1. I don't really count anything until I can see roots out the bottom of the cubes into the trays. Lights set to 18 on, 6 off – I tend to have them mainly on at night for heat reasons.

Fill tank with fresh water.
Add Ionic grow to 0.8ec
Add 60ml Liquid oxygen ( and 30ml per day )
Add PH down to 5.8 ( I find mixing PH down with water in a sports bottle makes it easier instead of a pipette of concentrate to get it perfect )

If after 24 hours your EC drops, top the nutrient to 0.85ec, if it does it again 0.9ec and so on. You will soon get the hang of it.
Adjust PH daily also. A swing of 5.8 to 6 is perfect for a day.

The rest of veg is the same depending on how many weeks you go. I tend to go for 4 myself as its all my space allows. As each week goes past you will need to up the EC as required but the rest stays the same.

Make a SCROG/Support net as well. I personally more LST than scrog, just to keep the plant growing more horizontal than vertical and remove fan leaves blocking light a few at a time. When we flip to flower this net will support the weight of the branches and buds – if you do not do this ( and I speak from experience ) your plants can topple over and rip roots :( I just wait till the branches are long enough and poke them gently back under the mesh to the next area.

To make a support frame I just used 2x2 and made a frame, with some eyehooks and string. As you will see I am not a joiner, but its not stupid if it works :)

User avatar
Nanook
Registered User
Posts: 9793
Joined: Thu Jan 01, 1970 2:33 am
Location: My nest
Has thanked: 507 times
Been thanked: 758 times
Contact:
Status: Offline

Re: NFT MADE EASY

Post by Nanook »

Flower week 1:-


Once your net is 75% full ( or sooner if you like ) its time to switch to flower – ie lights on 12 hours, off 12 hours. It is important NOT to interrupt the dark period. If you need to work when the lights are off, buy some cheap green LED lights for the room you work in, or a head torch.
Week 1 of flower you should still be using grow nutrients.
Continue to try and fill the scrog net during this week.

User avatar
Nanook
Registered User
Posts: 9793
Joined: Thu Jan 01, 1970 2:33 am
Location: My nest
Has thanked: 507 times
Been thanked: 758 times
Contact:
Status: Offline

Re: NFT MADE EASY

Post by Nanook »

Flower week 2:-


Time for bloom nutes!
Same EC as before, adjust accordingly, same PH only use bloom nutrients. Again this week, try and fill any holes left in the net – this will be the biggest stretch week.


User avatar
Nanook
Registered User
Posts: 9793
Joined: Thu Jan 01, 1970 2:33 am
Location: My nest
Has thanked: 507 times
Been thanked: 758 times
Contact:
Status: Offline

Re: NFT MADE EASY

Post by Nanook »

Flower week 3-6/7:-


Time to add in PK Boost! 1Ml per litre. Ionic has a handy app for mobile phones to help calculate the required amounts of nutrient. I have found it to be almost perfect and it saves a hell of a lot of mucking about. Deffinately recommended :)

Depending on strain your plants might now be ready. Again, depending on personal preference only you can decide but I tend to go with 75% cloudy, 25% amber trics. Once your getting close – probably week 7 or 8 of flower... start to flush with plain water only – NO NUTRIENTS!
I usually flush for 10-14 days.

User avatar
Nanook
Registered User
Posts: 9793
Joined: Thu Jan 01, 1970 2:33 am
Location: My nest
Has thanked: 507 times
Been thanked: 758 times
Contact:
Status: Offline

Re: NFT MADE EASY

Post by Nanook »

3 weeks flower....


User avatar
islandgrower420
Registered User
Posts: 240
Joined: Tue Nov 28, 2017 10:10 pm
Has thanked: 0
Been thanked: 0
Contact:
Status: Offline

Re: NFT MADE EASY

Post by islandgrower420 »

That is unreal!! Will you be removing any leaves one last time to really open her up?
Current Grow: White Widow DWC

Past Grows:
Cheese Autoflower - SOIL Indoor
UK Cheese - SOIL Indoor
King Tut Autoflower - SOIL Indoor
King Tut Photoperiod - SOIL Outdoor

User avatar
Nanook
Registered User
Posts: 9793
Joined: Thu Jan 01, 1970 2:33 am
Location: My nest
Has thanked: 507 times
Been thanked: 758 times
Contact:
Status: Offline

Re: NFT MADE EASY

Post by Nanook »

islandgrower420 wrote:
Mon Jan 15, 2018 5:57 am
That is unreal!! Will you be removing any leaves one last time to really open her up?
Really need to add to this but yes, I remove many daily tbh :)

Post Reply

Return to “Hydroponic Cannabis Growing”